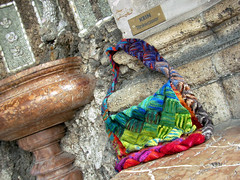
 It started with Elemmaciltur's blog. He wrote about this yarn dyer called the Wollmeise, and I investigated, couldn't choose, and so ordered one test-skein in each colorway. The day they arrived was very exciting.
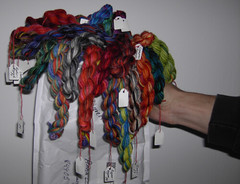 I don't really know what I had planned for them, but Claudia, in an email, said, "Can't wait to see what you do with them. Are you going to make a bag?" and the idea was born.
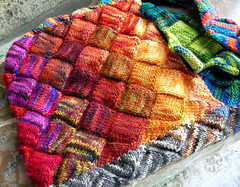 In attempting to write out the pattern for this bag stitch-by-stitch (more or less), I'm realizing that there are two separate issues here: entrelac, and this particular bag. And in trying to write out entrelac instructions, I realized that it is very difficult to describe using only words. Therefore, at some point I will post an entrelac photo tutorial for backwards knitters. If you don't knit backwards, the Danica scarf pattern will teach you what you need to know.
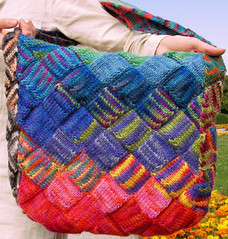 So for now, I'll assume that you know entrelac, and just focus on the bag part. Okay? Let's rock.
Stuff: needles, size 8 (5mm). About 40 test-skeins of Wollmeise Merino-Lammdochtwolle. That's all.
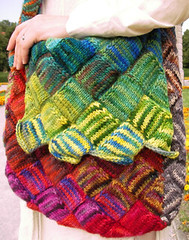
Dimensions: about 12 inches deep, about 12 1/2 inches wide, strap about 27 inches long.
Caveat: I didn't really document the process, I just improvised, so this is the how I remember something I knitted back in february. Please let me know if you run across anything that sounds impossible or doesn't work, or if you find a better way to describe something. I'd be grateful.
- cast on 40 stitches
- make 4 base triangles, each 10 stitches wide
- work even, in entrelac, um, until it's as long as you want. You want a sort of burrito-fold, the two sides of the bag plus some more for the flap. Mine was about 33 inches long, so the bag is now about 12 inches deep.
- You can work the end triangles if you want, for an even edge on the flap, but I just cast-off on the zigzag. Because it was more fun that way.
- once you have the big rectangle done, fold it the way you want the bag to be, and locate what will be the bottom of the bag. You'll want 10 selvedge stitches on one side, and you may want to mark the 10 on the other side with safety-pins or something, just to make sure you end up in the right place.
- pick up 10 stitches in the selvedge edge, working from left to right.
- work one entrelac base triangle.
- work the left edge triangle as usual, except: instead of kfb at the left edge, pick up a stitch in the next selvedge stitch of the big piece.
- ditto the right edge triangle: work to the end minus two, k2tg. pick up a stitch in the next selvedge stitch of the big piece, and pass it over the previous stitch.
- do that until the bag is as deep as you want (you should have run out of selvedge stitches to knit into on one side), then continue in normal entrelac. How many skeins did it take you to reach the top of the bag? Call that x, and knit up until you have x skeins left, then start again with the smoodging into the selvedge stitches.
- In the final triangle, you'll have to do a sort of modified 3-needle bind-off.
- Finally, invite some friends over for dinner and chat with them while you tuck in the eleventy bazillion little yarn-ends. It's the only way to make the job bearable.
7 comments:
Wonderful!
Greetings from Cologne
Aud
need to do something with my test hanks...
Looks fabulous - way to to take an idea and run with it!
GORGEOUS! I wish I could buy some of this yarn. I've heard nothing but raves.
Thanks for visiting and commenting on my blog again. Hope to see you around Ravelry. :)
Well Done!!! I want to do something with my test hanks too, but I don't think I'd use a bag. I'm keeping my mind open to ideas. Actually, I'm just waiting for Elemm to think of something cool. :-)
That is one stunning bag. Well done on a work of art!! The colours are shown to full advantage!!
You could felt the bag, to give it more stability and strength. It would look AWESOME felted.
Post a Comment